
How To Use Logic Pro X – For Beginner Film Composers
Logic Pro X is the ideal piece of software for film composers, but it can be tricky to know where to start. This Logic Pro X tutorial covers the basics of getting setup and ready to write!
For this tutorial I’m going to assume that you’re working with a short “home movie” style video, rather than a full length feature film. The basic ideas are the same, you’d just do it multiple times for each cue in a longer project.
Turn on Advanced Tools
This step isn’t completely essential, but I highly recommend turning on Logic’s advanced features so that you can get the most out of the DAW. I mean, why pay so much for professional software if you’re just going to use it like GarageBand?
Click on:
“Logic Pro X” > “Preferences” > “Advanced Tools”

And then select “Enable All”
Set Your Sample Rate
This step is so often overlooked, and can cause real headaches further down the line. Particularly if you’re sending your work to a video editor to do the final synchronisation.
Basically, the “sample rate” is the number of times the audio is “looked at” by the computer per second. For music the default is 44.1kHz (that’s 44,100 times per second – and how Logic automatically opens projects) but for film audio its 48kHz (48,000 times per second). This means that if a film editor imports your 44.1kHz audio into their 48kHz project, your music is going to be played very slightly slower than it’s meant to. All those moments in the movie that you worked so hard to emphasise aren’t going to line up.
Go to “File” > “Project Settings” > “Audio”

And change the “Sample Rate” to 48kHz

Import Your Movie
Now we start to feel like we’re actually getting somewhere…
Go to “File” > “Movie” > “Open Movie” and find the movie that you’ll be working on.

You’ll be presented with this little dialogue:
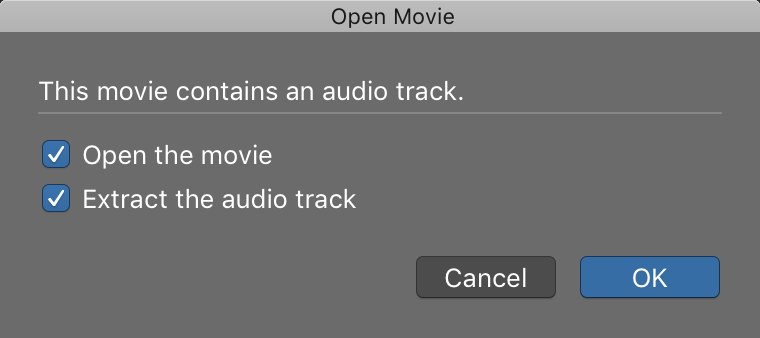
You’ll want to have both boxes ticked. If you don’t “extract the audio track” then the audio will be kept contained in the movie. That makes muting it, or doing any needed audio editing (maybe taking out nasty noises/pops that have been left in) much more difficult.
You might also get a popup that says:

In which case, it’s best to select “Use XX” to make sure everything syncs up.
Now you’ll want to save your project and make sure you tick the “Movie” box under “copy the following files into your project” – that’ll stop it disappearing down the line.
On Your Marks
From here onwards is where personal preference starts to kick in. You might want to do things in a different order to this, and that’s totally fine and up to you.
The first thing I’d recommend you do is set up some markers so that you have an overview of the movie. If you’re working with a director, you might have already discussed this in a “Spotting Session.”
Open your marker window by clicking on the three lines at the top-right of the screen, and then selecting “Marker”

As we don’t know what tempos we’ll be using yet, we don’t want to set the markers to “bars” or beats, as they’ll be moving all over the place when we start playing around with tempo.
Therefore you’ll want to go to “View” > “Show Event Position and Length as Time”

Then set you playhead to “0” (hit the “return” key) and click on the “+” sign to add your first marker. To adjust the length of the marker, you simply click on the numbers and drag them up or down, bearing in mind that if you click on “seconds” (in the example above that’s the “03”) then you’ll adjust by whole seconds, if you clicked on “minutes” (“06” in my example) the you’ll adjust by minutes, and so on.
Watch your movie through and adjust the length of the marker to match each “section” of the piece you’re going to write. For example, your movie might start with a romantic section before moving into something more funny. Set your first marker to cover the whole of the romantic section and then add a second marker (by placing your playhead and using the “+” button in the “Marker” tab) to cover your “funny” section.
Tempo & Signature
Next to the “Marker” section you’ll see options for “Tempo” and “Signature”

This is where writing to picture really changes from (most) songwriting projects. We aren’t going to set the tempo/signature for the whole project and leave it at that. We’ll be including a variety of tempo and signature changes throughout the piece.
You should already have an idea of what kind of piece you’ll be writing, and will therefore know what signature you’ll be writing in. Go ahead and set that as the main project signature for now. This is the only time you’ll touch that “main” signature section.
I always say the best way to set your tempo is to feel it. Don’t try to work it out mathematically or anything like that, as it will always feel a bit off. Watch your movie, with your melody in mind, and try to figure out a natural pulse. Then you can use a BPM counter to tap along and figure out what your tempo is. Go ahead and set that as well, to whatever showed up on the BPM counter.
Now we just need to tweak things to make sure everything lines up perfectly. There are two things you might need to adjust here:
- The tempo (by very slight amounts)
- The signature (to add/remove a beat)
If you can get away with just adjusting the tempo, great. Adding/removing a beat can be really difficult to get sounding natural in a composition.
Move your playhead to the end of the section (where your marker ends) and then put in on the closest full beat. With a bit of luck, this will be a barline. If it’s not, try adjusting your tempo by 1 or 2 bpm in either direction to see if that makes the barline line up. If it still hasn’t, then we’ll have to mess around with signatures, but first, let’s make sure our tempo is perfect.
Make sure your playhead is on a barline or beat and then you simply have to drag the tempo numbers after the decimal point (by default these are .0000) up or down while watching the movie closely. As you drag the numbers up you’ll see the movie moving backwards, and as you drag them down you’ll see the movie progress. Drag them up/down until your beat/barline falls exactly on the cut or image that you want your music to hit. Do that for every decimal point and your music will hit the point at the exact moment. To be honest, being that precise is overkill, but can be good practice.
Now, if your scene cut didn’t line up perfectly with a barline, you’ll need to adjust the signature at a point too. To do so, you’ll probably want to start some composing first, so that you can work out where you’re going to add/remove a beat. Once you know, just line up your marker to the correct bar, click on the “signature” window, and click the “+” icon, adjust the signature, then move your playhead to the next bar, and set the signature back to what it way. Simples.
Going forward, you’ll make any signature or tempo changes in those windows. Do not touch the “project” tempo in the bar at the top centre of the screen, as it’ll ruin everything!!!
Compose
The easy bit, right? Write your masterpiece! Telling how to compose the whole project is far beyond the scope of this article, but you’re set up and ready to go now, so this is the time to do that. A quick overview of the process I’d suggest going through though:
- Create a “sketch” or very basic outline using very basic sounds (piano/strings)
- Develop that “sketch” onto all the instruments you plan to use
- Only after completing 1 and 2, load up your best sample libraries and start making it sound great
- Mix
- Master
Only 5 steps…makes it sound easy when I put it like that! In real life, it’s a slightly longer process…
Deliver
If you’re working with a music editor, or someone else is syncing the music to the final movie, you’ll want to export as you usually do from logic: set your locators and “bounce” the audio. Use .aiff or .wav and make sure it’s set to 48kHz, preferably 24BIT. Top tip: remember to mute the movie audio!!! The last thing the music editor needs is all of the dialogue (which is probably just a draft version anyway) doubled up in the music!
If it’s your own project, you can go to “File” > “Movie” > “Export Audio to Movie”

Now, I’ve had quite a few times where this goes wrong. Trying to work out why within Logic and messing about with it isn’t worth the time. It’s far quicker to simply bounce the audio on its own and then sync the audio back up to the video in iMovie, or DaVinci/Adobe/Final Cut/whatever. Trust me.
And there you have it! You’re officially a film composer. Kudos! 🙂
If you want to learn more about the process of composing, looking at those 5 steps above in a bit more detail, please feel free to check out my course Music Production in Logic Pro X : Film Music Composition.
You can also get more tips and tricks at my website: soundtrack.academy
This article was brought to you by Songcards
© 2025 Unlock Your Sound Ltd | Privacy Policy